
For the past 2 1/2 years I’ve been involved in several personal projects around our property. Please keep in mind, I performed nearly 100% of the work on all of these projects myself. Of course this included a learning curve, several engineering solutions, the design and of course the actual building itself. Being an architecture enthusiast, I’ve formulated several design philosophies over my lifetime.
– Detached Office: Knowing, I’d be doing mostly ‘remote’ work, I decided to build a detached office; allowing me to stay focused on the jobs at hand.
– Detached Water Filtration Building: Our property has a well 1/3rd of a mile from the house. It’s operation has been precarious since the day we bought the property. Most risky is the pressure tank required to get the water to the house. The task was to convert an abandoned root cellar to a building to house all water processing equipment.
– New well Housing: The well housing was severely dilapidated.
Office
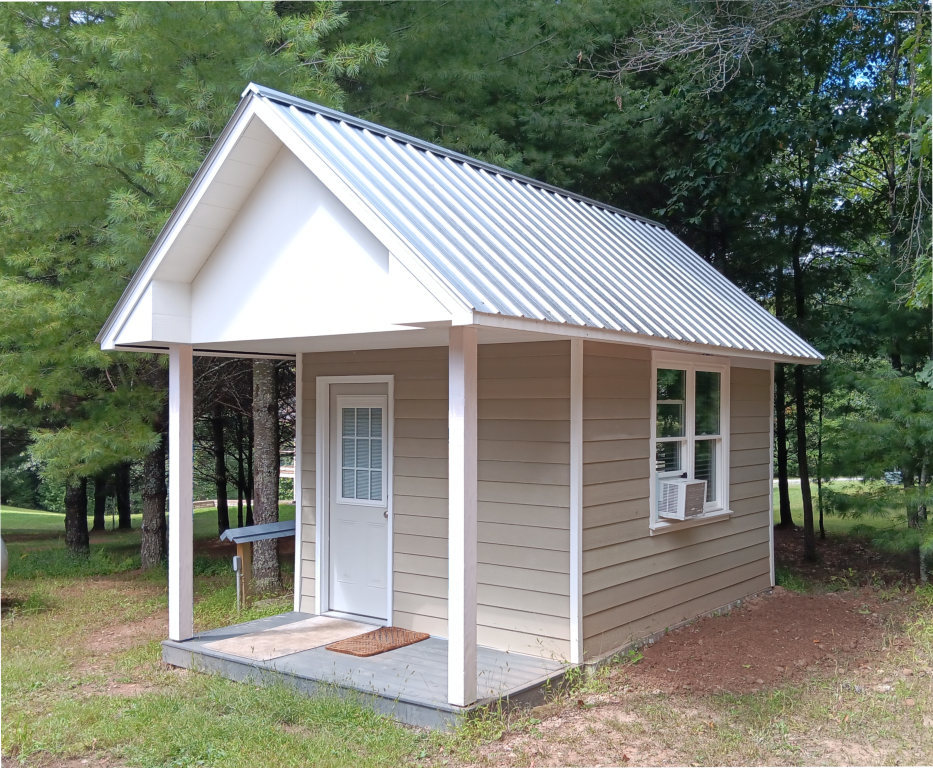
Upon purchasing the property there was a 10′ x 12′ abandoned footing. I had no idea of what it was to be used for. I suspected it was going to be a dog pen as the previous owners hunted and the property was littered with remnants. After pondering a wood shed, I decided to build an office.
I dug out the footing and the inside of the footing, packed and laid crusher run, packed it again, then formed it and laid down a layer of sand. I then installed a moisture barrier, and 2″ rigid foam. On top of that I laid out the radiant floor tubing using tube stands. Please note, I did something similar with the root cellar project so the next step was a single visit. I then called upon the only contractor I used in any of my projects; the concrete guy. They came out and poured the concrete and then screened it. Unfortunately, as is often the case in these rural parts of West Virginia, the quality of the work was not up to my standards. But, at least I had a layer of concrete now with radiant tubing for the office. Winter was quickly approaching and I hadn’t yet poured the footing for the overhanging porch nor trenched for the electrical and data from the sourcing building. I needed a large auger and didn’t have one. So, I reached out to our locally well-respected excavator. But, again, ‘timing’ is not their forte. Knowing he needed to arrive before the ground froze, he did just that. He got the two cores dug and a trench for the data and electrical, but left me zero time to do the concrete work. Regardless, it had to get done. So, after getting the cardboard forms and backfilling ‘lightly’, I started mixing concrete in freezing temperatures using hot water, working at hyper speed, and setting rebar as I went. Knowing that curing concrete in freezing temperatures is very bad for quality, I tarped and heated with small space heaters. I’d wake up several times throughout the night to check the temperatures. Lucky for me, it all worked. But, I could have done without the stress. Also, laying the PVC piping for electrical in the newly trenched pit in freezing temps was not a fun feat either. Especially, since I couldn’t backfill until the earth thawed. Regardless, I got the pipes in and the data and electrical pulled in their respective conduit. But, for the remainder of the winter, I was having to step over the 2 foot trench to stock our exterior wood burning stove. Again, not ideal, but navigable. Spring couldn’t have come quickly enough.
I then built the walls, designed a unique truss system and built the roof. I researched and built a hot cutter to accurately and quickly cut the rigid foam to 14 1/2 widths. For those in the know, between the studs it made the studs 16″ on center and had an excellent R-value. The windows were yet another obstacle as I had begun this during Covid. That meant the dual double hung windows were backlogged 6 months. I couldn’t wait so I engineered a mullion strip in the center, bonded two double hung windows together and installed them in the walls as they were being assembled. I ran MC conduit to reduce EMF and PVC from the attic to allow a completely flexible wiring scheme. I then sheathed the outside and added a layer of house wrap. I then added a 3/4 complete wrap of rigid insulation around the outside eliminating any thermal bridges and added yet another layer of house wrap. I trimmed the corners with PVC and then proceeded to install the Hardie siding.
My trusty tractor and I worked quite hard to get all the trusses up, the roof sheathed, the roof wrapped, and the metal roof installed just before winter set in. Again, did I mentioned I self taught myself every step of the way and even improved on several facets of construction. I pitched the roof 40 degrees to make sure snow didn’t hold. Why 40 degrees? Because it was the maximum pitch to utilize standard 8′ studs. I opted for no gutters, but am now rethinking them. The way I engineered the trusses, allowed me to have a navigable attic. This made data, electrical, HVAC, and speaker wiring a breeze. Ok. Not a breeze, but certainly better than any alternative.
Now that the roof was on and the siding was up just before winter, I could then venture inside. With my trusty little space heater, I installed all the drywall, mudded it, sanded, prepped, and painted.
This summer I spent finishing details: custom soffit, squared eaves, caulk, and small gap Hardie pieces. I now have one very functional remote office, complete with wide windows on 3 sides and a door with a window on another.
Just a few more interior pieces to complete it. But, for now fully usable. YEA!
Water Filtration Building
Oh boy was this an aggressive task. Let me start by saying it used to be a root cellar. But NO ONE would have ever known. It was as hillbilly a shack as I’d ever seen; complete with shingle sides, part metal, part asphalt roof, scraps of plywood making a wall and occupied floor to ceiling with junk at least a decade old. Oh, not the junk you’d see in storage units. More like completely deteriorated wood shelves with canning jars spread across a dirt floor piled high in junk, mold, rats, snakes, raccoons, and mice. I spent the first month in a Haz-mat suit, emptying it one truck load to the dump at a time. Here’s a perfect side story: it was summer, I was over dressed in protective gear, my goggles were steamed over and I was pulling something off a shelf. On top of the sheet I was pulling off I saw a bicycle tube which fell on my shoulders. I don’t know who was more scared, the 4 foot black snake or me. It scurried off and I quickly read up on what could have been my fate. Only to learn, black snakes are my friend cause they like mice. After several nauseating trips, I finally got the thing emptied and the top layer of dirt shoveled off. I then stepped back to ponder my next steps: fix it? or tear it down and build it proper?
Well, I decided to tear down most of it and fix the rest. Out came my trusty tractor; yank, push, side swipe, rinse, repeat. Because of its age, most of the materials predated the toxic era. Regardless, I built two piles; one safe to burn and the other off to the dump. All that was left standing was a bermed cinder block wall. I power washed and disinfected it. I dug out an extra 6 inches until I hit the footing. That was a relief as building like this don’t usually even have that. And, much to my surprise, it also had drain tile on the exterior. Winter came quickly halting any more work on that, that year. But I spent the winter designing and planning. Since it was close to the dimensions of the office (see above), several of the structural elements were the same. Like the office, I designed a low ceiling. This lowered energy costs significantly by cutting 1/8 the height. And since it was only a utility building, it didn’t need to be ‘inhabitable’ ceiling height. Despite the lowered ceiling I still needed to add 2 courses of cinder block because of the planned concrete floor just to clear the high end of the berm. So, that was my first task the next spring. Taking into account the R-value of the required ceiling, I ended up with 2 more feet of framed wall on top of the cinder block, and a double joist system with rigid foam between the joists. “Double joint” simply means joists running perpendicular to each other and one on top of the other. This, again, reduced thermal bridging and allowed for a ‘workable’ attic area. I opted to keep all the electrical in the framed wall to conceal it and make sure no water ever reaches it. Again, the concrete subcontractor was difficult to schedule. When they came and did their work, I was finally relieved. Only to later learn of their less than stellar work. Most critically, they didn’t slope it adequately towards the in-floor drain system I installed. I got as much completed as possible, but then winter sprung up more quickly than expected. A pattern which I must learn to adapt to. Not having enough time to install the trusses, I laid them on top and covered the whole thing with plastic tarp. Note: no matter how much one thinks they’ve covered everything, it’s never enough. By mid winter, I noticed entire pools of frozen ponds where the plastic sank between the trusses. And, of course, water seeped in. By next spring I had a mess to content with. But, I got things under control and got the trusses, sheathing, roof tarp and metal roof up the first part of that following summer. I then finished the electrical, drywall, and painting. Several tasks remain to make it operational, but at least it’s a fully contained building with a solid door. I’ve yet to install the mini-split and even bigger than that is the excavation remaining. That contractor has been back logged several months and still haven’t heard back from him. Knowing my luck, he’s going to repeat the last-minute before winter visit like he did for the office. And somewhere out there is an electrical run which suffered its fate during my demolition fanatical phase. And since it’s not closed loop, I wasn’t able to locate it using sensoring equipment. So, I’ve got to do it the old fashioned way: dig, dig, dig. My excavator can’t come quickly enough. When he arrives, I’ll have him locate the wiring and the existing water run to our house. When that’s done, I can ‘redirect’ the water and provide permanent power to the new building. Until then, I’ll keep using my extension cord. Ugh! Stay tuned. I’ll take some pics.
Well Housing
As stated up front, the well has to transfer the water 1/3rd of a mile. The well housing, upon purchase was, to say the least in very poor shape. I built a new one which will be here long after I’m gone. It’s the same style as the nearby water purification building (described above). About the only design decision worth mentioning is the R-value of the ceiling was adequate to maintain 50 degrees in the coldest of weather.